Tuesday, September 24, 2013

Butterick 5678 - Classicly tailored shirt

Dear readers,

My stash-bustin' continues!  I've recently finished the classic shirt - from Butterick 5678  -- and with tips from Craftsy's Perfectly Tailored Shirt class.  This is a vintage-inspired cotton searsucker (light seer suckering:)) Sorry the photos are so large -- I was trying to capture the details here.
It is perfected fitted -- but not perfectly executed.  I highly recommend this pattern, Butterick 5678, a princess seam classic shirt.
 I've never been able to buy a shirt off the rack with perfect fit.  So, I'm thrilled.  It was easy to modify this pattern since I've got bodice blocks to compare the pattern with.

I'm last to the party with a classic shirt -- but thrilled to have finally made one!
 I ran out of fabric 3/4 of the way through the project -- and had to run back to Mood, panicked.
 I can't say enough how comfortable this is.  Pamela's video Craftsy class really helped when I got stuck on the execution.
 The burrito method of doing the collar is difficult to master -- you can see my execution isn't perfect (yet).
I believe I over-fitted this -- but it is perfectly fit.  So, I can't totally complain!

I'm going to make more classic shirts -- not sure yet if I am going to use this pattern, but I do like it.

Sunday, September 22, 2013

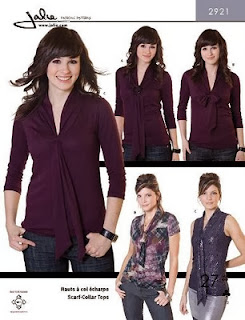
Jalie 2921 - Scarf Collar Top X 2

Dear readers,

The stash-bustin' continues.  Today's quickie -- a new TNT pattern for me -- the Jalie Scarf Collar Top.  It is as good as everyone says! It is Jalie 2921.  A shirt a day this weekend.
This pattern is as good as everyone says -- I love the "burrito" technique for the scarf -- fantastic.  I didn't realize the SA was 1/4".  Oops.  But I probably did the sides 1/4" anyway.  It is a perfect fit.  It is a bit low in the bust -- but I think a tank will help.  I cut a "W" size and made the largest sleeves and eased them in. 
 This only took 6 pieces to cut out.  Fully serged (with some sewing in the collar area).
Here is the copy of the pattern photo below:


 I didn't expect to love this top but I did.  I added my standard 3/8" to both shoulder seam allowances.  I have a large neck so this is the best alteration (thanks to Connie Crawford at ASG for suggesting this!).
 This pattern was so good I went ahead and made my remaining fabric of the butterfly Betsey Johnson fabric from Mood.  I had to use scraps so the shoulder seams were not what I would have normally done and I needed to cut down on the scarf collar length.
By the way, there is a Jalie 30 year celebration ongoing with a contest.  I didn't know it when I started the knits -- but I'm in!  Here is the flyer from Pattern Review:
Don't you love when you stumble across a TNT?

XOXO,

Pam


Wednesday, September 18, 2013

Project Bags! A great idea from a friend.

Dear readers,

I was in a friend's sewing room studio in DC last winter.  She had the best idea.  She used XL bags to store all the things involving a project -- the fashion fabric (cut or uncut), the pattern, and all the notions and findings needed.
I thought what a fantastic idea.  So, I bagged up my next ten projects with GLAD XL bags (from Lowe's), minus any notions or findings (I am not THAT organized).   I think this will keep me on track a little better  -- I tend to daudle when I sew.    And, it clears out my stash for more fabric:)

Now, if I can just figure out where to store these bags. . .

Do you keep project boxes or bags, or have some other method for indicating your fabric is for a special project?  I'd love to hear.

XOXO,

Pam

Tuesday, September 17, 2013

New Look 6166 - Pendleton Fabric Shawl Vest

Dear readers,

Finally, this project was a LOT more difficult than I expected.
 This is New Look 6166 -- a wonderful pattern.  I based it on the following inspiration below:
It's not exactly the same.  I missed buying it (and it was pricey) when it came in last season.

This year they also have another evening star-ish vest on their Fall line right now:
A little closer view of the matching and fitted arms.
 Boy, there is a reason that these Pendleton garments are expensive.  This fabric - Evening Star, a light to mid - weight blanket fabric was unwieldy and difficult to put together.  I ripped out the sides six times the first time I tried to match up the pattern.  Finally, I put in pins and actually sewed over them (no needles broken in case you were wondering).  This is after using jeans needles and a roller foot.  I thought it would take an hours to put together - NOPE.  Two days after cutting.
 I picked up the frog/finding at my knitting store I really like it.  I made a chevron patter for the shawl collar.
Again, getting the collar to turn was even a bear.  I see how coats can be difficult now.  Some notes:  
the Pendleton Woolen Mills Store in Portland is fantastic.  It turned out I made some errors in my cuts -- not a problem -- they sent me (via phone and email) their last yard (lucky!).  Also, they suggested felt as a binding (they have in stock).  I love it but ended up not going with the felt binding as the pattern I think is too busy.  I can always add it later.  Plus my execution on binding, based on my past record, is sketchy. 

I think turning blanket type of fabric into a garment is tough - there is a reason the cost for Pendleton is high -- it really takes industrial machines to get a professional finish in a thick garment.  I really worked and steamed this garment.  That said I'm very happy with it.  I might have made it a bit too fitted, but I can live with that.   Whew!  I was going to make a second one -- but now I am going on to my next project. 

Have you made any Pendleton items?

XOXO, 

Pam

Monday, September 16, 2013

Kwik Sew 3115 -- Yoga Pants in Polartec

Dear readers,

Still in the mood for a quick fix -- I made these Polartec Yoga Pants - My TNT pattern from Kwik Sew in Medium.  I've made them before and blogged about them Here in Black Polartec.
A perfect fit - but I didn't hem the pants (nor did I serge) Polartec does not unravel.  If I wanted to hem -- I'd definitely add an inch or two (please not I have a 31 inch inseam).    I cut them out last night and made them today in less than an hour (and after a candle zippo type of lighter exploded in my hand causing very little burns - so lucky).  
 I've worn my black ones (in thicker fabric) totally to death.   I still take those fuzzys everywhere I go.

I also used this drawcord elastic below (instead of the 3/8" elastic called for and cut it 30").  It is available on Judy Kessinger's Website Fitnice System.
I love them.  I made these a bit snug, but I can live with that.  Plus, post-surgery I need to lose a few pounds.  

Don't you love a good TNT pattern?

XOXO,

Pam

Sunday, September 15, 2013

Scrap shorts for me! Not popular in my house. NOT popular.

Dear readers,

Upon returning home from a buying spree at Seattle Fabrics -  Website, I decided to "whip" up a project using some scrap Malden Mills polartec -- quickee shorts.
 Some materials just shouldn't be shorts.  Like heavy duty fleecy Polartec -- you cannot see in the pictures - but the pile is large on this and tends to catch between my legs.  I don't care --  I like 'em.  Perfect for dog walking on cool mornings.
They are not my favorite.  I didn't really use a pattern -- merely Judy Kessinger's pants sloper to test it (don't blame her -- I modified it).

Anyway, after a few glasses of wine -- J. was like -- those shorts are terrible, they are garbage.  They are not good.  I had to laugh.  They aren't good but I don't care:)  He normally loves my projects.  These smurfs didn't do the trick for him though.

Anyway, off I go on the dog walk wearing them.

Hey, I sew for me:)  So, dear readers, do you ever make anything your spouse, significant other, children, friends don't like -- and you really don't care?  I'd like to hear it!

XOXO, Pammie

Wednesday, September 11, 2013

Pendleton Vest Inspiration - New Look 6166

Dear readers,

I've been dying to make a Pendleton vest with a shawl collar from this inspiration:
I finally found a pattern that has a Shawl Collar, with princess seaming.  New Look 6166 -- and it only takes 7/8 yard fabric from 60" roll.
So, using some Pendleton Fabric in my stash (I blogged about it HERE), I planned to make this vest.   View E (the middle vest on the left side column).  I have one yard from a 60 inch roll.  I tissue fit the pattern vest -- making only adjustments to add length to the shoulder seam and moved the shoulder seam forward (I have slightly tilted forward wide and high shoulders, thicker neck than the norm).

Here are my pinned cuts on the dress form without the shawl collar.  Pendleton has named this fabric Evening Star.   One piece I cut slightly short.  The vest is 2" longer than the pattern calls for I have a long body -- so the shorter cut may not be a problem, I can crop it without problem due to the extra fabric.
However, I did not have enough excess fabric to make the pattern work on the shawl collar, see below:

Oops, the diagonals don't match.  But I do like the idea of the diagonal for the shawl collar -- any opinions out there?

But, I called Pendleton woolen mills and problem solved!  They are sending me another yard (discounted).  Here is their Website and Blog -- definitely worth a visit if you are in the Portland area.  At the same time I went ahead and ordered the felted binding -- that would be the easiest finish.  I also orders some Rancho Arroyo Aqua -- under a half yard in case I need it too.  Note to self:  Order more fabric than you need with prints.
Now, I can finish this week if I can get my serger thread changed.  That may be a big if.
XOXO,

Pam


Tuesday, September 10, 2013

Laptop Sleeve! My quick craft fix for the day.

Dear readers,
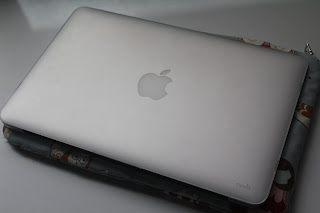
My new 11-inch Macbook Air, bought on a whim when I needed a laptop to take to an evening class.   We are a Macintosh house -- so everything is Apple so everything works together.
Now, one of the mandatory accessories for any laptop computer that belongs to someone who travels -- is a travel case to protect it. Apple provides a plethora of accessories -- even Coach and Michael Kors bags should you need it for your Macbook Air.  But, I thought -- I'd rather have my own DIY Tutorial Case.  Let's break out the internet.

I used this tutorial-- the Laptop Sleeve Tutorial Link..  Excellent.  By the way, the 11inch Macbook Air measures 14 1/4"Long by 15 3/4" Wide with 1/2" SA (Seam Allowances).
 The outer fabric is a canvas type of fabric (which I sprayed with Scotch Guard, available at your local grocery store).
   The inner fabric is minky.
The multi-color zipper is Ghee's -  Ghee's Link.  It was a 28 inch zipper -- and I saved the other multicolor portion.  Ghees sells the actual pull which can fit any other piece too.  So convenient that I can use the portion I didn't use for this project.

Also, did you know the mark of a good zipper is one when you pull the zipper tape apart and the pull doesn't move or slip down?  Well, it turns out that the more expensive zippers have locks in the zipper pull.  That's why in the 80's the zippers in our pants wouldn't zip all the way up and we were all constantly readjusting our zippers -- Cheap zipper pulls!! Who knew?  The things you learn at the ASG Sewing Conference.

 I was a little sloppy in the execution, but I can live with it.  It's a perfect fit for the Macbook Air!  And, this quick and easy project -- I needed a quick craft success fix.

Now, onto another cover for my Kindle.

XOXO, P.

Monday, September 9, 2013

Classicly Tailored Shirt -- Butterick 5678

Dear readers,

I'm taking a craftsy class "The Perfect Tailored shirt."  However, I am only around half way through the class.  So, I am starting my shirt project anyway -- although I am modifying to use a princess seam pattern, for the first one.

Here is the fabric I'm using -- a cotton print, a little bit vintage inspired, from Mood.
 This is the pattern I selected and I modified it using my sloper (or basic bodice blocks)
Although the class calls for a pattern without princess, such as this one below: Vogue 8689.  Maybe next time. I'm tempted to get a Connie Crawford pattern now that I've seen how good they are drafted.
Here is where I stand below.   I'm missing about a half yard of fabric (I'm going to Mood Monday afternoon -- fingers crossed).  Last time I was there about three months ago -- a few hundred yards remained on the roll.
As a result of the process, I've been researching tailored shirts.  Here is a women's Navy Officer shirt - from Brooks.  Very fine materials and well-tailored.
 Here is the perfect collar; you can see some of the inside:
 Perfect sleeves and plackets.
 Wonderful job on the collar stand
 Overall, the execution is excellent -- but the fit is not good.  I loved the hidden placket (below) and I learned to do this easily at Connie Crawford's class at the ASG.
So, have you sewn any tailored shirts?  Tip and tricks??

XOXO, Pam

Sunday, September 8, 2013

1944 House Dress Underlining and Snaps

Dear readers,

If you remember I created the 1944 House dress where I blogged about it HERE.
I did two techniques very different from my normal process.
First, I underlined the dress -- a different technique than a lining.
The fashion fabric was very sheer.
I chose a black batiste for the underlining.  In retrospect, a lighter weight voile fit the project better -- the batiste is a bit dense - making the dress a tad bit heavier -- and causing my fingers to be sore pushing the needles through the fabric for hand-stitching the finishes.  Threads has a great article on underlining that discusses the change of hand for the fashion fabric (click on the link to go there).  
Overall, I did find the underlining much easier to sewing rather than a lining in this project.  I serged the fabric fabric and underlining together and assembled the dress as I would if no lining was involved.  

I did think a red voile might have been a better background color -- but couldn't source the red locally, so I was eager to start the project and in the end, I'm happy with the black. 

The square collar, below, under construction was difficult to set correctly.  The picture blow shows the collar before I turned it inside out and top-stitched it.  The corners were especially challenging.  The setting may have been easier without the underlining, in this instance.

I will make this dress again -- but I will do so without the underlining.  That will make for a super simple and easy project, since I have all the details worked out now. 
Note to self:  For three years, I've been using cheap serger thread.   I finally changed to Maxi-Lock  -- it has made all the difference.  I love it.  No breaks, and much easier to thread the serger.  I have a vintage serger, the Bernette 334, made by Juki around 1980.  All steel baby.  And, the smell of ozone while it's serging. 

Second, in the construction of the dress - I used heavy duty snaps.  The snaps make the dress so easy to get in and out of (Easy In -  Easy Out).  I also preferred heavy snaps so there were no surprises when I was wearing the dress during the day.  I found it very tricky to insert the snaps - both process-wise and in the execution -- that is, ensuring the correct distance between the snaps. I used the Home Pro Tool set, with nailhead and eyelet die sets (bought at Ace Sewing) in the LA Fashion District. 
Having the correct tools is key in the snap world.   I don't know if I would recommend this set yet.  It seems more substantial than the hand tools.  It has no directions that accompany the piece.  I know it does a variety of services - - but can't figure out (yet) everything.  I originally bought this when I was in the middle of my jeans obsession.  I had a hand tool that broke.  But this set is expensive, considering that I don't bedazzle everything.  But perhaps I should rethink that and start bedazzling everything.   That would bring down my cost per bedazzle. 

What snap tool do you use?

XOXO, P.